Recent General Posts
Spring cleaning
3/22/2017 (Permalink)
 Lets get to spring cleaning
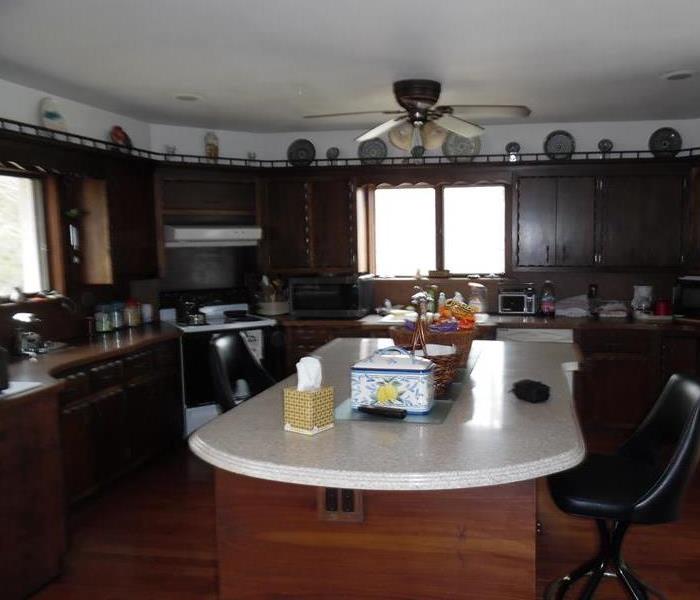
Spring Cleaning 101: Easy ideas for deep cleaning your kitchen
Welcome to spring cleaning season! It's that glorious time of year when you finally get to throw open your windows to let in the bright spring light and notice the layer of dust and grime that has built up in your home all winter. But don’t panic! We’re here to help tackle that cleaning to-do list.
We know you don’t want to spend those first nice spring days inside with a scrub brush, so we’re officially giving you permission to spread out the cleaning chores, and we think dedicating just a few hours once a week is the way to go. Simply deep clean one room at a time, and in a month, your whole house will be refreshed and spring ready.
3 easy hacks to keep your fridge clean and organized
You’re halfway through your month-long spring cleaning spree and still going strong. Now it’s time to tackle the kitchen. Don’t despair! The kitchen has so many appliances and messy areas that it might seem overwhelming, but you can do this. It is a large task, but it’s also surprisingly meditative once you get going. And nothing beats a spotless kitchen. So gather your supplies, put on your favorite upbeat album for energy, and power through this one. You’ll be so glad you did.
Here’s what you’ll need:
- Rubber gloves (optional but highly recommended)
- Microfiber cloths or clean rags
- Warm water and a mild soap
- Baking soda
- Glass cleaner (or make your own by combining a 1:1 ratio of water and white vinegar in a spray bottle)
- Degreasing spray
- Broom or vacuum
- Mop
- Old toothbrush or another small brush for scrubbing
- Stepstool
How to clean surfaces and storage
- Take out the trash and recycling and wash the cans with warm soapy water. Leave them outside turned upside down to dry. Remove all products under your sink and take stock. Throw away any empties or products you no longer want or use. Wipe down the walls and floor and hardware of the cabinet and neatly return your products to where they were.
- Empty cupboards of dishes, pots and pans, appliances and don't forget your silverware/gadget drawers. Wipe inside with soapy water. Don’t forget to clean silverware holders or other organizational tools that tend to get really grimy. If your flatware or dishes are looking less than spotless, run a load in the dishwasher before returning it all neatly to the clean cupboards.
- Get a step stool and wipe down the tops of all kitchen cabinets. Use a degreasing product and wipe the front of all cabinets and drawers, paying special attention to handles and cabinet pulls. Wipe light switches and door handles well. Wipe windowsills and tracks with a microfiber cloth. Polish your windows with glass cleaner and newspaper.
- Next, thoroughly scrub your sink and faucet. Clear everything off your countertops and wipe them with mild soapy water. Or, if you have specialty surfaces like marble, use the appropriate cleaner for your material. Clean any small appliances that live on the countertop like the toaster, blender or coffee machine and put them back in place.
How to clean appliances
- Locate your refrigerator’s coils which are usually either behind the fridge, or behind a panel below or above the front doors (pop off the cover to expose the coils themselves). Use your nozzle vacuum attachment or a long brush to remove all the dust and build up which can prevent your fridge from running efficiently and cause it to wear out faster.
- Empty all food and condiments from the fridge and throw away any expired food. Remove the fruit and veggie drawers and wash them in the sink with mild soapy water. Wipe down the shelves. Clean the outside including the top, doors, and handles. Pay special attention to the rubber seals that tend to collect crumbs. If your fridge is stainless steel, use either a specialty cleaner or a tiny amount of oil on a clean cloth to polish away fingerprints.
- To clean the microwave, fill a glass bowl with about a cup of water and a splash of white vinegar and microwave it for three minutes until it’s boiling. The steam-clean will help soften caked-on food inside so you can wipe it away with less scrubbing. Remove the turntable and give it a wash in the sink with dish soap. Wipe down the inside, outside and handles with a grease busting spray.
- Remove the knobs from your oven and pop them into a bath of warm soapy water to soak. Remove your stovetop grates (if you have a gas stove), and spray a degreaser on the range hood, stovetop and backsplash. Scrub away all baked-on food and grease. If the soak didn’t do the entire job, scrub the oven knobs clean with an old toothbrush and pop them back on. Check your oven to make sure it’s empty then set it to self-clean mode.
- Move on to your dishwasher and check the filter (usually located under the top rack) for any food that may have gotten stuck. Rinse and return the filter, then run your empty dishwasher on hot using a specialty appliance-cleaning product like this one.
- Run the tap and flip on your disposal to grind up anything that may be inside. Then, with the blades still running, add a few ice cubes and grind them up to sharpen the blades. Finish by grinding half a lemon to freshen the whole area.
How to clean kitchen floors
Sweep the floor or use the vacuum to remove debris. Use the crevice tool to clean in small spaces like the gaps between the countertop and the oven or behind the fridge. Wipe down baseboards with a microfiber cloth and warm soapy water. Mop or scrub the floor. Remember to work strategically from the far corner toward the door, so you can leave the room without tracking footprints across your spotless floor.
Extra credit
Deep clean any regularly-used items like your tea kettle, coffee pot or blender jug by soaking for several hours in a 1:1 water and white vinegar solution to remove residue. Wash thoroughly.
And remember if you do not want to deal with the Spring cleaning call SERVPRO of Dover / Stillwater and let us do it for you. 973-810-2825
Tax Season
3/8/2017 (Permalink)
 Back door remodel and deck remodel.
When economists write about taxes, they rarely use the word, choosing instead to refer to taxes as incentives. The idea, of course, is that government policy can be most effectively implemented if government gives citizens an incentive to do what the government thinks is right.
The best current example (although who knows how long it will last) are incentives that will cut energy use in homes (solar panels on the roof) and in cars (electric or hybrid cars that use less hydrocarbon fuel) and emit less of the carbon that contributes to rising global temperatures.
There are also incentives for homeowners who make certain other types of improvements. Audrey Ference at Realtor.com presents a list of improvements that can save homeowners some real cash.
Energy-Efficiency Upgrades
If you replace an old furnace, for example, with a qualifying energy-efficient model, you are eligible to deduct up to $200 from your federal tax payment. There's a lifetime cap of $500 for this deduction, and to qualify the system must have been purchased in 2016 for your main residence. Here are a few other items that qualify:
- $300 for a qualifying biomass stove
- $300 for qualifying air-source heat pumps
- $300 for qualifying central AC systems
- $300 on qualifying water heaters
Energy-Generation Systems
This includes things like solar panels, solar water heaters, fuel cell systems, wind turbines and geothermal heat pumps. The tax deduction for these improvements is 30% of the project's cost, and there is no upper limit. Improvements to both your main residence and any vacation home are allowed, but you have to move reasonably quickly. The tax credit expires in 2019, unless Congress and the president renew it.
Medically Necessary Modifications
Adding a ramp or modifying doors and stairways to accommodate medical requirements are among the improvements you can make that are eligible for a tax deduction. There are limits however. The modification must be medically necessary and cannot increase the value of your home. For example, if the doctor says you need more exercise and you put in new swimming pool, the deduction won't be allowed. In addition, the total cost must exceed 10% of adjusted gross income (7.5% for people over 65). The full amount of the modification is deductible.
Remodeling Projects
Adding a room or remodeling a kitchen is not deductible, but the change in the basis of your home's value can be valuable when you decide to sell the home. If your basis price rises, it helps offset the appreciated value of your home and could reduce any capital gains tax you might have to pay on the sale.
Interest on Home-Improvement Loans
Interest on a home improvement loan or home-equity line of credit (HELOC) is deductible if you use the money for renovation. The deduction limit is $100,000 and any kind of home improvement is eligible.
Spring is in the air
3/8/2017 (Permalink)
 Spring will be here soon
Spring is on the way, which means there’s no time like the present to get your overgrown or neglected garden into tip top shape. But where to start?
1. Assess Your Space
Gold says the first thing to do is take a complete assessment of your garden, starting with finding any hazards that need to be addressed. Are there broken branches that could hurt someone? A danger of tripping or falling because pathways are partially concealed or covered up? Are the stones or concrete on walkways covered in a slippery moss that needs to be pressured washed? You’ll want to deal with safety issues first so that you don’t have any issues once you get to work.
Next, Gold says, decide what needs to be pruned based on your sightlines. Is the view blocked? Can you not see your favorite plant in the backyard because it’s overgrown? Take note and make a plan for when work begins.
Finally, you’ll want to find any areas that may be so overgrown pests like raccoons, possums, or yes, even rats, may have made a home there. Gold points out these not only devalue your property, but they can also cause your neighbors to have infestations as well. But mostly, you just want to get rid of anything like that because who wants a family of possums living in the backyard?
2. Begin the Cleanup
Now that you’ve assessed the space and decided what work you’re going to do, Gold says it’s time to start the cleanup. Pull weeds, trim bushes and hedges, and make sure the trees are topped and thinned. Chances are a lot of material is going to come out of your garden during this part; Gold recommends you send it all to a green waste recycling place so that the process is environmentally friendly. You may also want to put in a weed retardant system if you find you’ve just pulled what seems like an excessive amount of weeds. Find one that’s environmentally responsible as well as kid and pet safe.
3. Investigate the Irrigation System
Gold points out the number one reason for plant death is a lack of watering. In fact, he says most lawns need to be watered every day for three to seven minutes and most plants need to be watered three times a week. Since the chances are good you’re not up for that kind of commitment, he recommends you install an irrigation system. This way any work you do going forward has a much better chance of surviving. Install a PVC system with pop-up heads for your lawn and a drip system on a separate valve for your perimeter beds, plants, and bulb gardens.
If you already have an irrigation system, Gold advises you get it audited before you start any work to make sure there are no leaks. Animals may have chewed on the drop irrigation system above soil and older galvanized tubing can rust and clog. Now’s the time to make sure all of the valves are functioning properly and the timer is working.
4. Think About the Plant Palette – and Get Planting
Gold suggests asking yourself are if you think there are enough plants already in your garden already so that it looks full or if there are empty spots where the weeds took over. The good thing about putting plants in, he says, is that they take up the space where weeds may otherwise grow.
Now’s also the time to figure out what kind of plants you want. First and foremost, Gold says you want to decide what you use the garden for. Are you looking out the window at it? Entertaining in it? Do you want a vegetable garden? Do you have children or pets? All of those things will help determine what types of plants you use, as well as the design.
- Inspect Your Soil
You’ll also want to determine what kind of soil you have, so that you’re picking plants that will thrive in that soil. To do this at home, fill a mason jar halfway with soil from your garden. (Dig down about 12 inches and get a sample from the top of the whole to the bottom.) Then, take ¼ to ½ teaspoon of dishwashing soap and mix it with a cup of warm water. Put that into the mason jar and shake it really well so it’s nice and agitated. After a day or two, everyhting will settle into neat and even layers so you can see exactly what you’ve got in your soil. Voila!
Gold recommends filling at least half of your garden (if not all of it) with plants that are native to your area because they help support the local flora and fauna and have the best chance of thriving. But if you’re still stuck, pick a color palette you like (pretty pastels, bold red and oranges, etc.) as that will help you narrow down the selection even further.
- Get Ready to Mulch and Compost
After the planning is done and everything is happy, Gold says it’s time to compost and mulch. Mulch helps protect the soil, stop weeds from growing, and (when used with compost) acts as a fertilizer, so it’s truly a crucial step. You can even ask your local tree trimming company if they’ll bring some to your house. Many of them are looking to unload their mulch and will do it for free. Just be sure the mulch doesn’t include eucalyptus.
Gold also strongly recommends you don’t use a weed cloth or filter fabric as mulch is on the surface where the sun is hitting to protect the soil and the organisms that live in the soil from being eradicated by the sun, but it also needs to work its way down into the dirt so it feeds the organisms that break everything down and fertilize the soil.
Gold says you’ll want to start with a fine layer of one-inch thick compost. Then, add at least three to four inches of mulch, but, he warns, be sure you don’t pile it against tree trunks, bushes, or around your plants. It doesn’t have to be perfect, he says, but you don’t want to smother your plants or cause moisture retention in stems or wood because that will cause your plants to rot and fail.
Gold says it’s also really important that you layer your mulch based on your soil conditions. If you have sandy soil, you may need to add clay. If you have acidic soil, you’ll want to add lime, etc. Over all you want the pH level to be around six or seven.
People who mulch their soil without fertilizing at the same time will rob the soil of nitrogen, Gold says. And that can kill all of the little microorganisms who need that nitrogen to have energy to chow down and do their job. Fertilizing’s not just a one time deal though. Gold says you’ll want to do it three to four times a year with a product that is natural and has no oil products, specifically urea-formaldehyde, which is toxic to humans and pets (but found in a lot of the most common fertilizers out there.)
- Maintain Your Gorgeous Garden
Okay, so technically this doesn’t fall into the getting your garden ready category, but since you made it this far, you’ll want to be sure weeds are pulled every month or every other month. (Pro tip: Companies like Gold’s can usually do it for under $100). Gold says even with four inches of mulch, you’re going to have a few weeds pop up and it’s important to pull them out because you don’t want the weeds to set seed and grow in the top of the mulch.
- Enjoy the Fruits (and Vegetables and Flowers) of Your Labor
After all of that hard work, it’s time to pour yourself a drink, sit back, and take it all in. You’ve earned it.
Spring Cleaning
2/23/2017 (Permalink)
 Think spring it is right around the corner.
When you think of spring chores, you probably think of “spring cleaning.” But before you can really clean, you need to get organized. We talked to Jennifer Roach, a professional organizer on Thumbtack and owner of Organization Fabulous in Southern California who helps people organize their homes, offices, wardrobes, and more, to get her tips and tricks for where to start.
Jennifer’s biggest piece of advice? Make it fun. “You’ve got to put on music.” And when it comes to getting rid of stuff and de-cluttering, she suggests having someone to bounce ideas off of. “Invite your favorite positive and perky person over and let them know that you’re not trying to keep stuff. Music and fun people are key.”
But it doesn’t stop there. Read on for Jennifer’s 10 fun and inspiring “mantras” for getting organized this spring.
And One Place for All
“Create a communication station,” Jennifer says. This station should be very close to where you come in the door or car. “You can use a little table or a tiny part of your kitchen counter. This is where your mail gets dropped, your keys go in a key bowl or on hooks, and you have a calendar so you can communicate with your spouse or children where everyone is at any given time.”
The Trays Have It
“Trays are the coolest things. You can buy them for $10 to $20 and they are an easy way to control the clutter.”
Jennifer suggests using a tray to make a valet tray. “Especially for men. They can put their watch, wallet, charging station, and a little bowl where they can drop their change.” This is helpful for someone who may tend to leave things all over the house, she says. Now they know: if you don’t know where something is, it’s going to be on the tray.
Trays are also great for kids with projects. “At the end of the night, you put all of the Legos or the puzzle on the tray and then there’s no disruption for projects that are going to be continued the next day.”
Trays are also an easy way to create a “bar” with all of your entertaining essentials, keep kitchen pieces handy and neat, or organize bathroom clutter. They help bring together like items and give them a streamlined look.
Look Up, Look Down
Use walls for storage in small spaces, Jennifer says. “I have no cabinets in my tiny bungalow in California so I wasn’t sure what to do with my pots and pans. I put hooks on the wall and it’s cool because now I love looking at my really cool pots.”
Taking advantage of wall space is a great way to keep things handy, but also out of the way, especially things you want to stay visible and neat. And it doesn’t have to be an eyesore; spend a little time making it stylish so that when you look at whatever is hanging on the wall, it brings you joy.
Hook ‘Em, Y’all
Hooks are a great way to manage clutter, Jennifer says. “Use hooks for pots and pans, hats, backpacks, hand towels, and more. Cup hooks in the closet are a great way to keep jewelry organized. You can see what you have and it doesn’t get tangled.”
The Land Down Under
Beneath your bed (and anything space under it) is prime storage real estate. “You can buy bed risers so you can store more stuff,” Jennifer says. “Or get bins with wheels and use it as a drawer system.”
Typically it’s probably easier to use under-the-bed storage to put clothing that’s not in season, extra blankets, or luggage. And no matter what, you still want to keep that area clean and tidy so that you’ll sleep well at night knowing everything is organized and in its place.
Fold On
“Folding the right way will change your life,” Jennifer says. The key is to fold everything in equidistant thirds so everything is the same size. That will enable you to store things like shirts standing upright in the drawer, so you can see everything you have and nothing gets lost at the bottom of a pile.
One Off, One On
If you don’t want to live in a cluttered space, Jennifer says you must follow this rule: For every one thing that comes into your home, one thing must go out. That means if you buy a new piece of clothing, you have to remove one item from your closet (and donate it) when you come home. This will keep your space clutter-free and organized.
Toss It, Baby
Don’t keep things you don’t need, Jennifer says. “Take pictures of the barcodes on your electronics boxes and then toss them,” she says. “People think they need to keep the boxes for everything, but it’s a waste of space.”
Other things you can throw away (or recycle) without guilt: outdated electronics, old paperwork/files, anything that’s expired (medication, spices, etc.), anything that’s broken that you haven’t gotten around to fixing.
Release and Release
“You’ve got to release your attachment to things,” Jennifer says. “My motto is either honor it, store it properly, or donate it to give someone else joy. We put too much importance on things. All we need is our memories.”
Do It Now.
“Don’t procrastinate. Whatever it is: if something needs to go upstairs, or be put away: do it now. That will help you with de-cluttering.”
And remember if you need help removing items or getting those carpets cleaned call SERVPRO of Dover Stillwater 973-810-2825 or find us at SERVPRODOVERSTILLWATER.COM.
Home remodeling is on the rise
2/17/2017 (Permalink)
 Water in a basement.
Homeowners are planning to spend more to improve their homes this year, up 6.7 percent to a total $317 billion, according to the Joint Center for Housing Studies at Harvard University. More remodeling activity generally indicates fit financials at the household level, as well as confidence and strength in the housing market.
“Growth in home prices is continuing at a healthy pace and encouraging homeowners to make remodeling investments,” says Chris Herbert, managing director of the Joint Center. “Home sales are remaining on an upward trajectory, as well, and this, coupled with continued growth in remodeling permit activity, suggests another strong year for home improvements.”
The National Association of Home Builders (NAHB) Remodeling Market Index (RMI) read 53 in the fourth quarter of 2016. (An above-50 reading signals more remodeling activity than less.)
Many remodelers are seeing consumers commit to larger, long-term home improvement projects,” said 2017 NAHB Remodelers Chair Dan Bawden in a statement on the RMI. “As Americans are seeing wages and home values rise overall, it gives them greater confidence to go ahead and invest in their homes.”
“At 53, the Remodeling Market Index is consistent with NAHB’s forecast that remodeling market activity will continue to grow over the next two years, but at a more moderate annual rate of 1 to 2 percent,” said NAHB Chief Economist Robert Dietz.
In the fourth quarter of 2016, demand for “major alterations/additions,” according to the RMI, fell to a reading of 53, while demand for “smaller remodeling projects” rose to 52. Demand for “home maintenance/repair” fell to 54
So If you are thinking of remodeling your home and investing more money into it please remember to protect that investment with proper insurance. That means going with a top rated agent and a top rated insurance company not just the cheapest one out there. Remember you get what you pay. And should you have a emergency loss with water, fire, or mold call a professional like SERVPRO of Dover / Stillwater and we will make it "Like it never even happened."


 24/7 Emergency Service